iptables is a relatively low-level Linux firewall solution and command-line utility that uses netfilter chains to control network traffic. iptables operates with rules associated with chains. A rule defines the criteria for matching the packets traversing a specific chain. iptables uses tables to organize rules based on criteria or decision type. iptables defines the following tables:
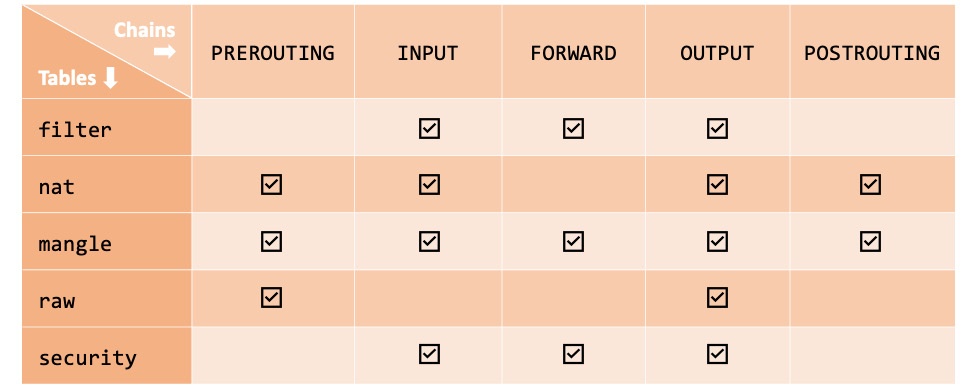
- filter: The default table, which is used when we're deciding if packets should be allowed to traverse specific chains (INPUT, FORWARD, OUTPUT).
- nat: Used with packets that require a source or destination address/port translation. The table operates on the following chains: PREROUTING, INPUT, OUTPUT, and POSTROUTING.
- mangle: Used with specialized packet alterations involving IP headers (such as MSS = Maximum Segment Size or TTL = Time to Live). The table supports the following chains: PREROUTING, INPUT, FORWARD, OUTPUT, and POSTROUTING.
- raw: Used when we're disabling connection tracking (NOTRACK) on specific packets, mainly for stateless processing and performance optimization purposes. The table relates to the PREROUTING and OUTPUT chains.
- security: Used for MAC when packets are subject to SELinux policy constraints. The table interacts with the INPUT, FORWARD, and OUTPUT chains.
The following diagram summarizes the tables with the corresponding chains supported in iptables:

Figure 1 – Tables and chains in iptables
The chain traversal order of the packets in the kernel's networking stack is as follows:
- Incoming packets with localhost destination: PREROUTING | INPUT
- Incoming packets with remote host destination: PREROUTING | FORWARD | POSTROUTING
- Locally generated packets (by application processes): OUTPUT | POSTROUTING
Now that we're familiar with some introductory concepts, we can tackle a few practical examples to understand how iptables works.
The following examples use an RHEL/CentOS 8 system, but they should work on every major Linux distribution. Please note that starting with RHEL/CentOS 7, the default firewall management application is firewalld (discussed later in next article). If you want to use iptables, first, you need to disable firewalld:
sudo systemctl stop firewalld
sudo systemctl disable firewalld
sudo systemctl mask firewalld
Next, install the iptables-services package (on CentOS):
sudo yum install iptables-services(On Ubuntu, you must install iptables with sudo apt-get install iptables).
Now, let's start configuring iptables.
Configuring iptables
The iptables command requires superuser privileges. First, let's check the current iptables configuration. The general syntax for retrieving the rules in a chain for a specific table is as follows:
sudo iptables -L [CHAIN] [-t TABLE]The -L (--list) option lists the rules in a chain. The -t (--table) option specifies a table. The CHAIN and TABLE parameters are optional. If the CHAIN option is omitted, all chains and their related rules are considered within a table. When no TABLE option is specified, the filter table is assumed. Thus, the following command lists all the chains and rules for the filter table:
sudo iptables -LOn a system with a default firewall configuration, the output is as follows:

Figure 2 – Listing the current configuration in iptables
We can be more specific, for example, by listing all the INPUT rules for the nat table with the following command:
sudo iptables -L INPUT -t natThe -t (--table) option parameter is only required when iptables operations target something other than the default filter table.
Important note
Unless the -t (--table) option parameter is specified, iptables assumes the filter table by default.
When you're designing firewall rules from a clean slate, the following steps are generally recommended:
- Flush any remnants in the current firewall configuration.
- Set up a default firewall policy.
- Create firewall rules, making sure the more specific (or restrictive) rules are placed first.
- Save the configuration.
Let's briefly look at each of the preceding steps by creating a sample firewall configuration using the filter table.
Step 1 – Flushing the existing configuration
The following commands flush the rules from the filter table's chains (INPUT, FORWARD, and OUTPUT):
sudo iptables -F INPUT
sudo iptables -F FORWARD
sudo iptables -F OUTPUT
The preceding commands yield no output unless there is an error or you invoke the iptables command with the -v (--verbose) option; for example:
sudo iptables -v -F INPUTThe output is as follows:
![]()
Figure 3 – Flushing the INPUT chain in iptables
Next, we'll set up the firewall's default policy.
Step 2 – Setting up a default firewall policy
By default, iptables allows all packets to pass through the networking (firewall) chain. A secure firewall configuration should use DROP as the default target for the relevant chains:
sudo iptables -P INPUT DROP

sudo iptables -P FORWARD DROP

sudo iptables -P OUTPUT DROP
The -P (--policy) option parameter sets the policy for a specific chain (such as INPUT) to the given target (for example, DROP). The DROP target makes the system gracefully ignore all packets.
At this point, if we were to save our firewall configuration, the system won't be accepting any incoming or outgoing packets. So, we should be careful not to inadvertently drop our access to the system if we used SSH or don't have direct console access.
Next, we'll set up the firewall rules.
Step 3 – Creating firewall rules
Let's create some example firewall rules, such as accepting SSH, DNS, and HTTPS connections.
The following commands enable SSH access from a local network (192.168.0.0/24):
sudo iptables -A INPUT -p tcp --dport 22 -m state \
--state NEW,ESTABLISHED -s 192.168.0.0/24 -j ACCEPT

sudo iptables -A INPUT -p tcp --sport 22 -m state \
--state ESTABLISHED -s 192.168.0.0/24 -j ACCEPT
Let's explain the parameters that were used in the previous code block:
- -A INPUT: Specifies the chain (for example, INPUT) to append the rule to
- -p tcp: The networking protocol (for example, tcp or udp) transporting the packets
- --dport 22: The destination port of the packets
- --sport 22: The source port of the packets
- -m state: The packet property we want to match (for example, state)
- --state NEW,ESTABLISHED: The state(s) of the packet to match
- -s 192.168.0.0/24: The source IP address/mask originating the packets
- -j ACCEPT: The target or what to do with the packets (such as ACCEPT, DROP, REJECT, and so on)
We used two commands to enable SSH access. The first allows incoming SSH traffic (--dport 22) for new and existing connections (-m state --state NEW,ESTABLISHED). The second command enables SSH response traffic (--sport 22) for existing connections (-m state –state ESTABLISHED).
Similarly, the following commands enable HTTPS traffic:
sudo iptables -A INPUT -p tcp --dport 443 -m state \
--state NEW,ESTABLISHED -j ACCEPT

sudo iptables -A INPUT -p tcp --sport 443 -m state \
--state ESTABLISHED,RELATED -j ACCEPT
To enable DNS traffic, we need to use the following commands:
sudo iptables -A INPUT -p udp --dport 53 -j ACCEPT
sudo iptables -A INPUT -p udp --sport 53 -j ACCEPT
For more information on the iptables option parameters, please refer to the following system reference manuals:
- iptables (man iptables)
- iptables-extensions (man iptables-extensions).
Now, we're ready to save the iptables configuration.
Step 4 – Saving the configuration
To save the current iptables configuration, we must run the following command:
sudo service iptables saveThe output is as follows:

Figure 4 – Saving the iptables configuration
We can also dump the current configuration to a file (such as iptables.config) for later use with the following command:
sudo iptables-save -f iptables.configThe -f (--file) option parameter specifies the file to save (backup) the iptables configuration in. We can restore the saved iptables configuration later with the following command:
sudo iptables-restore ./iptables.configHere, we can specify an arbitrary path to our iptables backup configuration file.
Exploring more complex rules and topics with iptables is beyond the scope of this chapter. The examples we've presented so far, accompanied by the theoretical introduction of iptables, should be a good start for everyone to explore more advanced configurations.
On the other hand, the use of iptables is generally discouraged, especially with the newly emerging firewall management tools and frameworks that have been shipped with the latest Linux distros, such as nftables, firewalld, and ufw. It is also somewhat accepted that iptables has performance and scalability problems.
Next, we'll look at nftables, a relatively new framework that was designed and developed by the Netfilter Project, built to replace iptables.


